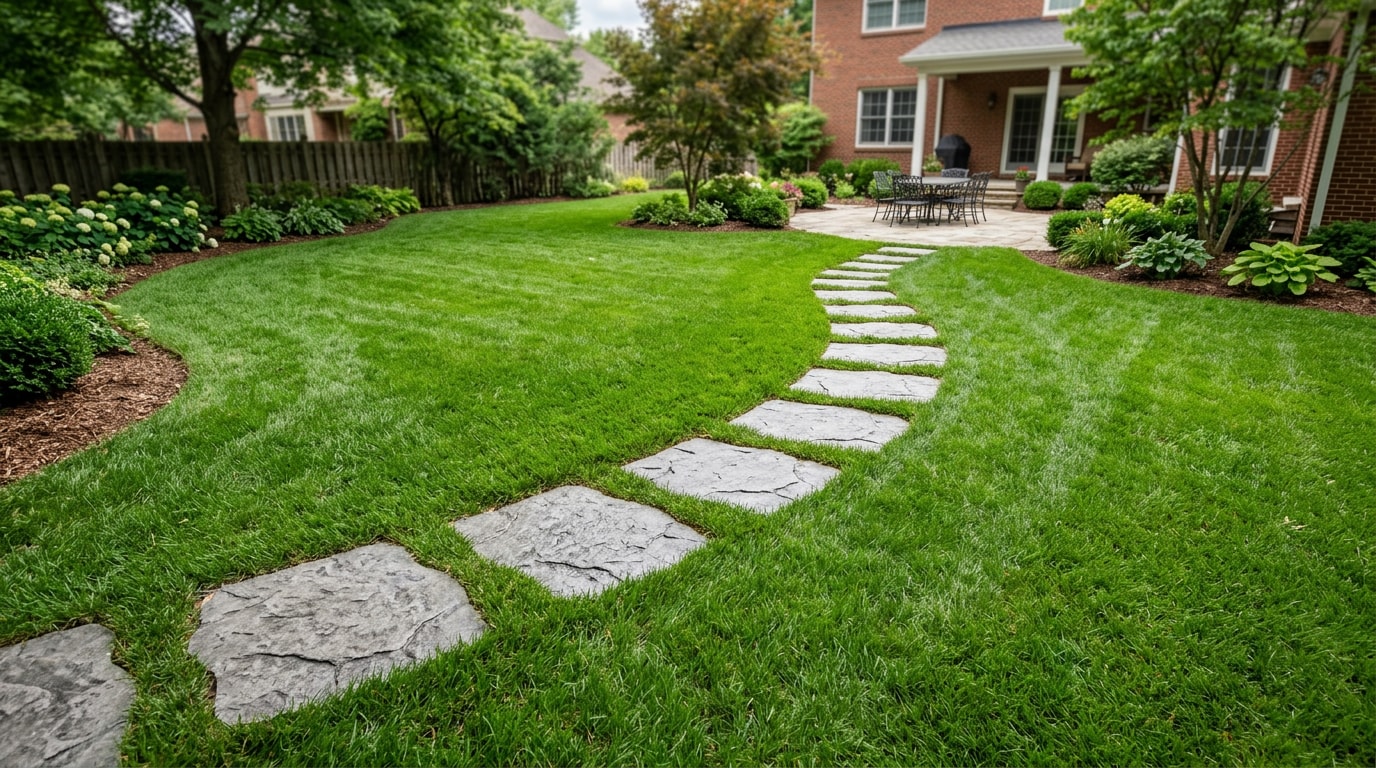
Concrete stepping stones in Indianapolis, IN turn a worn dirt shortcut across your lawn into a clean, defined path that can survive Indiana's clay soil and freeze-thaw winters. This guide covers thickness, base prep, spacing, and a full install walkthrough, plus the cleaning and sealing step most DIY guides leave out entirely. If you'd rather skip the digging, our crew handles the concrete side of these projects across the metro.
Visit Scott's Mobile Blasting to see our services and request a free estimate.
What Are Concrete Stepping Stones?
Concrete stepping stones are precast concrete units set individually into a path, rather than poured as one continuous slab. They can be textured or tinted to mimic flagstone or slate at a fraction of the cost, and because each stone moves independently, they tolerate ground movement better than a rigid poured walkway.
That independence matters more here than in most regions. Indiana's clay-heavy soil swells when wet and shrinks when it dries, and repeated freeze-thaw cycles each winter push poorly based hardscaping around. Individual stones flex with that movement instead of cracking as one piece.
When Stepping Stones Make Sense in an Indianapolis Yard
Stepping stones are the right call when you want a defined route without the cost or excavation of a full poured walkway. A few situations come up constantly in local yards:
- A side yard that turns to mud every spring after heavy rain
- A worn-grass trail between the patio and a detached garage or shed
- A path winding through raised garden beds where you don't want to compact soil around roots
- A secondary entry that gets light, casual foot traffic
If the path leads to a main entrance that needs to meet accessibility standards, individual stones usually aren't the right fit. The ADA Standards for Accessible Design require ground surfaces on an accessible route to be stable, firm, and slip-resistant, with gaps no wider than a fraction of an inch, a bar a gapped stone layout typically can't clear. A poured or tightly jointed paver walkway is the better choice there.
Stone Thickness and Base Materials That Hold Up in Indiana Clay
Thickness matters more than most buyers assume. The Concrete Masonry & Hardscapes Association's technical guidance for pedestrian and patio surfaces recommends a minimum paver thickness of about 2 3/8 inches for foot-traffic areas, with thicker units for anything that sees occasional vehicle weight, like a path crossing a driveway apron. Thinner stones flex and crack faster under freeze-thaw cycling.
The base underneath the stone does as much work as the stone itself:
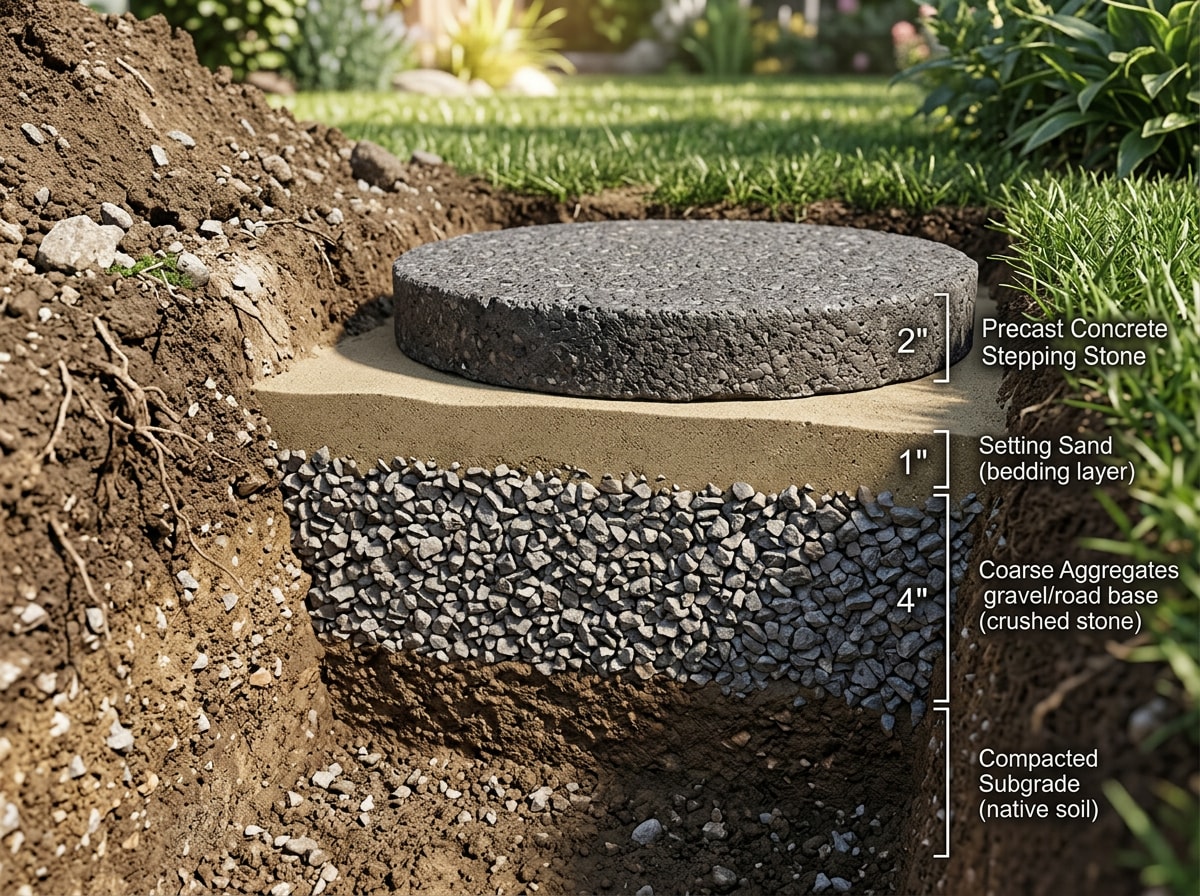
- Gravel layer: About 2 to 4 inches of crushed gravel for drainage and stability
- Setting bed: A thin layer of stone dust or coarse sand to fine-tune height and level
- Weed barrier (optional): Fabric under the gravel if growth between stones is a concern
Skipping the gravel base is the single most common DIY mistake we see. Stones set directly into dirt or sod sink, tilt, or heave within a year or two, and Indiana's heavy clay subsoil makes that worse because it drains slowly and holds water right where the stone sits.
Spacing and Layout: How Far Apart to Set Each Stone
Most residential paths work best with 18 to 24 inches of center-to-center spacing, matching a natural adult stride. Walk the route at a normal pace and mark where your heels land to find your own ideal spacing before digging anything.
| Path Use | Center-to-Center Spacing |
|---|---|
| Average adult stride | 18–24 inches |
| Path used mainly by kids | 14–18 inches |
| Accessible or wheelchair-adjacent routes | Continuous paved surface, not individual stones |
Lay the stones on the grass first and walk across them before you commit to a layout. It's far cheaper to shift a stone six inches now than to re-dig a hole later.
Step-by-Step Installation
- Plan the pathway. Lay stones on the lawn, adjust until the walk feels natural, then mark each outline with spray paint or chalk.
- Excavate each spot. Dig 4 to 6 inches deep to leave room for gravel, sand, and the stone itself.
- Add the gravel base. Pour 2 to 4 inches of crushed gravel into each hole and tamp it down.
- Add the setting bed. Spread about 1 inch of leveling sand or stone dust over the compacted gravel.
- Set the stone. Press it into the sand, check it with a level in both directions, and adjust sand underneath until it sits flush.
- Backfill the edges. Fill around each stone with soil, gravel, or decorative rock to lock it in place and keep mulch from creeping onto the walking surface.
Tools, Materials & Safety Checklist
Gather everything before you start. For compaction, a hand tamper works for a short backyard path; a plate compactor is worth renting for anything longer than a few stones.
- Concrete stepping stones
- Crushed gravel
- Leveling sand or stone dust
- Rubber mallet
- 4-foot level
- Spray paint or marking stakes
- Hand tamper or plate compactor
- Work gloves and eye protection
Cutting or moving concrete pavers kicks up dust and sharp edges. OSHA's construction PPE guidance calls for eye and hand protection any time you're cutting, breaking, or handling masonry materials, and it's a sensible baseline even for a weekend homeowner project.
Keeping Indianapolis Stepping Stones Clean, Safe & Algae-Free
This is the part most installation guides skip entirely: stepping stones in Central Indiana don't stay clean on their own. Shade, spring rain, and clay runoff combine to grow algae and moss on stone surfaces within a season or two, and that film gets slick fast once temperatures drop.
Scrubbing by hand or pressure washing can work on a small path, but it often just pushes grime into the stone's pores instead of removing it, and it can strip an existing sealer unevenly. Our crew handles this with low-pressure mobile sandblasting, which lifts algae, efflorescence, and old sealer residue off the stone without saturating the base underneath or damaging the concrete surface.
That cleaning step matters even more before resealing. If you're planning to reseal stepping stones, a patio, or a walkway this year, our Waterproof Concrete Sealer in Indianapolis, IN guide covers how proper prep extends sealer life through Indiana winters.
A few service pages worth knowing about if your stones (or the patio they connect to) need more than a hose-down:
- Concrete Surface Preparation for cleaning before sealing or re-coating
- Concrete Sandblasting for stripping old sealer, paint, or heavy staining
- Mobile Sandblasting when the work needs to happen on-site rather than in a shop
- Coating Preparation if you're sealing or coating the stones afterward
DIY vs. Hiring a Local Pro
Both routes work. The right one depends on path length, soil conditions, and how much excavation you want to take on yourself.
| Factor | DIY | Hiring a Pro |
|---|---|---|
| Labor | You dig, level, and set every stone | Crew handles excavation, base, and placement |
| Equipment | Hand tools, rented compactor | Professional-grade compaction equipment |
| Soil handling | Manual adjustment for clay drainage | Experience grading for Indiana clay |
| Timeline | Spread over a weekend or two | Usually completed in a day |
| Best for | Short paths, garden walkways | Longer paths, entry walkways, tie-ins to patios |
If your project is small and your soil drains reasonably well, DIY is a realistic weekend project. If you're dealing with a longer path, a low spot that holds water, or you want the stones to tie cleanly into an existing patio or driveway, it's worth getting a second opinion before you dig. You can see examples of past concrete and surface prep work on our Projects page, or browse our full Indianapolis, IN service area coverage.
Ready to talk through your yard specifically? Get a Free Estimate and we'll walk you through what your soil, drainage, and layout actually need before you buy a single stone.
FAQ
How far apart should concrete stepping stones be?
Most paths use 18 to 24 inches of center-to-center spacing to match a natural adult stride. Paths used mainly by kids work better closer, around 14 to 18 inches.
What do you put under concrete stepping stones?
A two-layer base: 2 to 4 inches of crushed gravel for drainage, topped with about an inch of leveling sand or stone dust. Skipping the gravel is the main reason stones sink or tilt in clay soil.
How thick should concrete stepping stones be?
Industry guidance for pedestrian surfaces calls for a minimum of about 2 3/8 inches of thickness. Go thicker for any stone that might see occasional vehicle weight, like a path crossing a driveway.
Can you install stepping stones without pouring concrete?
Yes. Concrete stepping stones are precast units, not a poured slab, so no concrete pouring or mixing is involved in the install. A compacted gravel and sand base is all most residential paths need.
How do you clean mossy or stained concrete stepping stones?
Scrub with a stiff brush and a mild cleaner for light grime, but for established algae, efflorescence, or old sealer, low-pressure mobile sandblasting removes it without damaging the stone or soaking the base underneath.
Is a stepping stone path accessible for wheelchairs or walkers?
Generally no. Accessible routes require a continuous, firm, slip-resistant surface with minimal gaps, which a spaced stepping stone layout doesn't provide. A poured or tightly jointed paver walkway is the better choice for a main accessible entrance.